Apart from cleaning and servicing the various components that came of the car during the strip down it has been a rather quite 6 months while the TR has been in for respray.
You may say 6 months is a long time, but I knew the summer was going to be busy at home so I said that the guys at Cartech in Kenilworth could take their time!
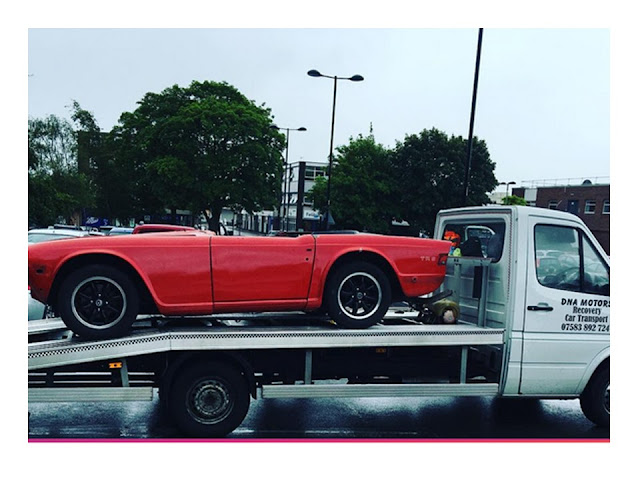
I have always thought that choosing to respray a car, although a great thing to do, always opens a hole load of cans of worms. For example, do you strip the car back to bare metal or do you leave the old paint be? The former means that you truly know what is underneath and the lines seem sharper, the latter is easier and cheaper. In the past I have always done bare metal resprays, but this time I decided not to as I didn't have the time to strip off all the paint. You also have to choose the colour of the car and what paint, solid or something with a clear coat on top. For a while I fancied a change to something like gunmetal grey, but eventually I decided to go with the original pimento, solid with no clear coat. The reasoning being that I liked the idea of keeping it factory and clear coated cars seemed too glossy. Anyhow off the car went on the back of a low loader.
Around November the spray guys started the work. They seemed to be much more sensitive to panel shape and found a whole load of minor dents that I couldn't even see. First to be sorted were the outer panels.
Which were then put into primer.
The rear wings where then mounted on the body and aligned. The chaps were a little concerned about how to get the alignment right and ended up talking to people in the states with expertise in rebuilding TRs. In the end to my untrained eye they got a pretty good result.
Then the body was primered and flatted back
And finally the topcoat was applied (now the car was looking great!)
The body shop then suggested that they deliver the car back to me to allow me to assemble it. From experience they new that often the bodywork gets the odd chip during reassembly. They then want the car back to sort any chips, paint the rear panel black and give the paint its final polish.
So the car duly returned on another low loader.
Now my job begins.. putting everything back on the car!
Saturday, 24 December 2016
Sunday, 12 June 2016
A fight with a TR6 heater
So, as the car is being pretty much totally disassembled for the respray I thought it would be a good time to rebuild the heater. After all it is pretty much "buried" deep behind the dash and my heater motor had been droning for a while. So job one... remove the heater. this entails.
1) removing a load of stuff that is under the dash
2) disconnect the cable from the heater control on the dash
3) disconnect the heater pipes (air and water). Beware of flooding the footwell with water!
4) unbolt the 4 bolts that attach the heater to the firewall..
Simple! or perhaps not.. all went well until stage 4 and then 2 of the bolts (that point upwards and attach to captived nuts "inside" the upper part of the fire wall sheared. Bu^&er! Deep breaths!! will sort that later.
withdrew the heater from under the dash and had a look at it.
As you can see it is not really what's called high tech. It is essentially a biscuit tine with pipes coming out of it. Two small ones for water and 4 large ones for air (you can only see 2 in this picture). The lower one is cold air (it is before the heater matrix) and the upper one on the right is hot air (after the heater matrix). There is also a motor (hidden under the dome on the left) and a flap on the right which (in theory controls where the air goes). I continued to take it apart (fairly easy if the self tapping screws that hold it all together are not rusted up!)
And heres's the motor (two speed) and fan. Now I knew the motor was a bit iffy and there was certainly some play in the bearings. So I looked at the price of a new one and had to sit down "how much!!".. to calm down I did a bit of trawling of the internet and found some inventive people across the pond had found a cheaper equivalent motor. Where did they find it? from a school bus of course!
Link to alternative TR6 heater motor. It has the same shaft diameter as the Lucas one in the TR. is two speed but without the external resister found on the TR version.. and best of all it was less that £20. Only issue would have been shipping, but I was working in the US in the next few weeks. So here it is in comparison to the Lucas item.
You'll see the size is about right. Note there is no shaft on the lucas one (left) as I had to cut it off to get the fan off. The only thing that is missing is the mounting flange. However I managed to rig one up using in jubilee clip (that was large enough to go around the complete motor body) and then a set of small "L" shaped brackets. Works great.
then connect to a battery for a test and wow.. what a difference.. the motor is smooth and silent and the power... amazing!
Next I stripped all the old paint and rust from the "biscuit tin" and then reassembled including new bits of foam around the heater to ensure that the maximum amount of hot air goes through and not around the matrix. (I use closed cell foam which comes on a roll for going under laminate floors, its cheap and self adhesive).
The final piece in the heater jigsaw is the heater flap. In theory I think the idea is that in one position the flap (and its foam backing) shut off air going through the heater forcing all the air (cold) out of the dash vents. In a second position the flap uncovers the pipes on the hot air side allowing air to flow to the demist and under dash vents. I think there is a third position (or at least there was in mine) with the flap fully down and poking out of the "biscuit tin". In this position the hot air was directed out of the bottom of the heater to the feet. All great in theory but position one didn't work because the foam had disintergrated (so new foam) and position 2 wasn't great as their were large gaps around the edge of the flap. This meant that the demist (perhaps the most important function was awful!).
So what to do... With a bit of lateral thinking I came up with a solution... draft excluders.. cheap (99p) and a MUCH better seal. I just cut them to size and riveted them in place.
Now all I have to do is refit.... But hang on... not so fast.. remember I had sheared two of the bolts that hold the heater in. you can see one of the offending studs pretty much below (the rusty patch on the front edge of the circular hole.
This is not going to be easy to drill out... So how about an easier strategy... weld in some replacement studs
Will need to tidy the welds.. but problem solved.
1) removing a load of stuff that is under the dash
2) disconnect the cable from the heater control on the dash
3) disconnect the heater pipes (air and water). Beware of flooding the footwell with water!
4) unbolt the 4 bolts that attach the heater to the firewall..
Simple! or perhaps not.. all went well until stage 4 and then 2 of the bolts (that point upwards and attach to captived nuts "inside" the upper part of the fire wall sheared. Bu^&er! Deep breaths!! will sort that later.
withdrew the heater from under the dash and had a look at it.
As you can see it is not really what's called high tech. It is essentially a biscuit tine with pipes coming out of it. Two small ones for water and 4 large ones for air (you can only see 2 in this picture). The lower one is cold air (it is before the heater matrix) and the upper one on the right is hot air (after the heater matrix). There is also a motor (hidden under the dome on the left) and a flap on the right which (in theory controls where the air goes). I continued to take it apart (fairly easy if the self tapping screws that hold it all together are not rusted up!)
And heres's the motor (two speed) and fan. Now I knew the motor was a bit iffy and there was certainly some play in the bearings. So I looked at the price of a new one and had to sit down "how much!!".. to calm down I did a bit of trawling of the internet and found some inventive people across the pond had found a cheaper equivalent motor. Where did they find it? from a school bus of course!
Link to alternative TR6 heater motor. It has the same shaft diameter as the Lucas one in the TR. is two speed but without the external resister found on the TR version.. and best of all it was less that £20. Only issue would have been shipping, but I was working in the US in the next few weeks. So here it is in comparison to the Lucas item.
then connect to a battery for a test and wow.. what a difference.. the motor is smooth and silent and the power... amazing!
Next I stripped all the old paint and rust from the "biscuit tin" and then reassembled including new bits of foam around the heater to ensure that the maximum amount of hot air goes through and not around the matrix. (I use closed cell foam which comes on a roll for going under laminate floors, its cheap and self adhesive).
The final piece in the heater jigsaw is the heater flap. In theory I think the idea is that in one position the flap (and its foam backing) shut off air going through the heater forcing all the air (cold) out of the dash vents. In a second position the flap uncovers the pipes on the hot air side allowing air to flow to the demist and under dash vents. I think there is a third position (or at least there was in mine) with the flap fully down and poking out of the "biscuit tin". In this position the hot air was directed out of the bottom of the heater to the feet. All great in theory but position one didn't work because the foam had disintergrated (so new foam) and position 2 wasn't great as their were large gaps around the edge of the flap. This meant that the demist (perhaps the most important function was awful!).
So what to do... With a bit of lateral thinking I came up with a solution... draft excluders.. cheap (99p) and a MUCH better seal. I just cut them to size and riveted them in place.
Now all I have to do is refit.... But hang on... not so fast.. remember I had sheared two of the bolts that hold the heater in. you can see one of the offending studs pretty much below (the rusty patch on the front edge of the circular hole.
This is not going to be easy to drill out... So how about an easier strategy... weld in some replacement studs
Will need to tidy the welds.. but problem solved.
Welding in the new rear deck.
So rear deck removed.. now time to put in some new metal. I decided to buy a complete patern rear deck and front passenger side deck extension (the piece that extends from the deck forwards to the B-post). These panels are not cheap and I am always a little wary of quality. In this case the quality was a little mixed. The rear deck was pretty good while the extension needed some fettling as it was a little too long. A trial fit looked reasonable after some fettling.
You can see along the right hand edge of the deck I have already drilled the panel for some plug welding. You can see the extension in place here. If you look closely I have also begin to weld the rear deck to the vertical support (below the mole grips)
And on the otherside:
Then I needed to sort out the plug welds for the rear. You can see the holes in the deck panel and how they line up with the lower horizontal support (well most of them do!)
Which I then plug welded (note I placed some silicone welding sheet below to protect the fuel pump etc.)
I also welded the panel to the inner wings and then checked alignment with the wings bolted up.
Not bad.. There is a bit of a gap (about 2 mm) where the wing meets the inner wing along the side of the boot. Interestingly when I took the wing off there was a rubber gasket between the wing outer and inner wing. I havn't seen this in the parts catalogue..
And the whole thing complete with new bootlid.
Much better!
Subscribe to:
Posts (Atom)